
Back then, I was just an obsessed armor builder and this book was a great addition to my reference library. Anyhow, one of the pictures from the Winter War always intrigued me—it’s a photo of a FT-17 dug in as a bunker/observation point.

The Finns had a couple of companies of FT-17’s during the
Winter War. Very few saw any
action — the Russians captured most of them in February 1940 — they were still
on the railcars that had transported them to the front. The few remaining tanks that weren't picked up by the Soviets were dug in as strong-points with the main
guns removed. Over the years, I’ve
searched to the point of ridiculousness trying to find another picture of a
dug-in FT-17 in Finnish service. I’ve seen one or two, but they were tourist
style picture taken in 1942-1943 during the spring/summer/fall (no snow on the
ground). So, I finally gave up my
search and decided to plunge ahead and build a small vignette with a dug-in
FT-17 and a Russian officer standing nearby. I used RPM’s FT-17 and Alpine’s #35039 Russian Tank Commander.


I used the RPM FT-17 because it was cheap—I paid about
$10.00 for it. It’s pretty basic
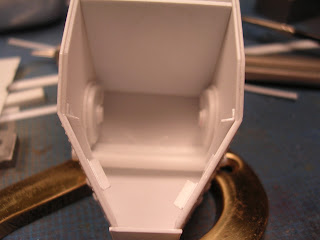
as a kit with not a lot of parts and decent detail. Perfect for what I was going to do. All I needed was the
upper hull and turret—everything else is buried. The turret is completely empty — the guns (from what I can
tell, all of the FT-17’s that were dug in were armed with heavy machine guns)
were removed prior to being dug in. This made things much easier for me, all I
needed to do was paint the interior flat black and I was good to go. I also had to add rivets to the turret using my Waldron punch and die set. It was mildly dull, but came out pretty good (and yes, I forgot to take pictures of the unpainted turret after I added the rivets...oh well).


In the picture, the right rear engine deck has been opened
and the engine is exposed. I used some Evergreen plastic structural shapes to
cobble together a basic interior and then went to the scrap box for a radiator
and engine. The radiator is from a long-gone Emhar German A7V (WWI German tank)
and the engine is from Tamiya’s 1/35 Jeep.


I added a bunch of “engine looking” stuff to beef up the look of the engine. I found a ton of pictures of Renault engines on the Internet, so I had something to go with. I never intended on building an exact replica of the engine, just something that looked “good” once it was painted/weathered and in the engine bay. I used a section of guitar string to replicate the radiator hose (which is broken/disconnected).


I added a bunch of “engine looking” stuff to beef up the look of the engine. I found a ton of pictures of Renault engines on the Internet, so I had something to go with. I never intended on building an exact replica of the engine, just something that looked “good” once it was painted/weathered and in the engine bay. I used a section of guitar string to replicate the radiator hose (which is broken/disconnected).


Stay tuned (or whatever we call waiting for some lazy-ass to
post on his blog) for the ongoing saga of the Finnish FT-17.
RJH
5.1.13
5.1.13